
How Long Does an Epoxy Garage Floor Installation Take? Jacksonville Timeline Guide (Hour-by-Hour Breakdown)
If you’ve been getting quotes for a new garage floor in Jacksonville, you’ve probably heard
June 24, 2026
If you’ve been getting quotes for a new garage floor in Jacksonville, you’ve probably heard wildly different answers to the same question: how long does epoxy garage floor take to install? One company swears they’ll be done in a single afternoon, another wants your garage for three full days, and a third says you can’t park on it for a week. Here’s the truth from a master installer who’s been laying coatings across Duval, St. Johns, and Clay counties for years: “1-day epoxy installs” are real for polyaspartic systems, but a traditional 100% solids epoxy job is a 3-day affair, and the timeline you actually get depends on which product you bought and what the slab looks like once we start grinding. This guide breaks it down hour-by-hour so you know exactly what to expect and how to spot a contractor cutting corners on the Florida humidity.
Before we get into the hour-by-hour, here’s the cheat sheet. Every coating system has its own chemistry, its own pot life, and its own recoat window. That recoat window is what dictates whether your job is one day or three. Polyaspartic and polyurea cure in 60-90 minutes between coats. Traditional epoxy needs 12-24 hours. There’s no shortcut — you can’t make epoxy cure faster by wishing.
| Coating System | Install Time | Walk-On | Drive-On | Full Chemical Cure |
|---|---|---|---|---|
| Polyaspartic (single-day) | 6-10 hours | 8-12 hours | 24 hours | 3-5 days |
| Polyurea base + polyaspartic top | 1 day | 12 hours | 24 hours | 5 days |
| Hybrid epoxy + polyaspartic top | 2 days | 16-24 hours | 48 hours | 5-7 days |
| Traditional 100% solids epoxy (3-coat) | 3 days | 12-24 hours | 72 hours | 7 days |
A typical 2-car Jacksonville garage is 400-500 square feet. A 3-car runs 600-800. The square footage barely changes the timeline because the cure window between coats is fixed — a one-man crew laying a 2-car polyaspartic in 8 hours is the same job as a three-man crew laying a 3-car in 8 hours. What changes is the prep day if the slab is in rough shape.
This is where the entire job is won or lost. I’ll tell any homeowner straight up: if your coating fails in two years, 90% of the time it’s because somebody skipped or rushed the prep. The bond between coating and concrete is mechanical — the coating physically grips into the pores we open up with diamond grinding. Skip the grind, you’re basically gluing paint to a polished countertop. It’ll peel.
Garage gets cleared — every tool, bike, lawnmower, and storage shelf out, including stuff hanging within 18 inches of the floor. Grinding dust gets everywhere even with HEPA extraction. We mask the bottom of drywall, door jambs, and garage door tracks with 6-mil plastic and blue tape. Water heater or fridge in the garage gets wrapped too.
The loud part. We run a planetary grinder (Husqvarna PG 450 or Lavina 25GX for residential bays) with metal-bond diamond tooling, usually 30-grit followed by 80-grit. A walk-behind HEPA dust extractor — Pulse-Bac or Ermator — pulls 99% of the silica dust off. Goal is a CSP 2 or CSP 3 profile — texture of 80-grit sandpaper. Slab looks chalky white when we’re done. 2-car bay: 2-3 hours. 3-car with rough control joints: 4-5 hours.
With the slab bare, every crack and pop-out shows up clearly. We chase hairlines with a crack-chaser blade, then fill with a polyurea joint filler (Metzger/McGuire RoadWare 10 Minute or Spartan Surfaces SP-1500). Spalled corners get a fast-set polyurea patch that’s grindable in 15 minutes. Control joints get filled and shaved flush.
Final CSP check (sometimes a fingernail test, sometimes an ICRI rubber profile comparator), full vacuum, tack with a damp microfiber, and a calcium chloride moisture test on new construction or history-of-dampness slabs. In Jacksonville the water table sits 3-8 feet down depending on neighborhood — on-grade slabs in Mandarin, Riverside, and the Beaches often read higher MVER than slabs in Nocatee or Julington Creek. Anything above 3 lbs/1000 sqft/24hr, we’re switching to a moisture-mitigation primer.
Not every job gets a primer — but in Florida, more do than don’t. If your slab tested high for moisture, if it’s older than 30 years, or if there’s any history of efflorescence (that white crusty stuff), we’re rolling a primer.
For standard slabs we use a thin-mil epoxy primer like Sherwin-Williams ArmorSeal 1000 HS or a polyaspartic penetrating primer from Spartan Surfaces. For moisture issues we step up to a 100% solids moisture-vapor barrier — Koster VAP I/2000 or Aquafin VB. The vapor barriers cost 3-4x more per gallon, but they’re the only thing that’ll save the floor when MVER is above 5 lbs.
Primer goes down with a 3/8″ nap roller after a perimeter cut-in with a brush. A 2-car bay takes about 45 minutes to coat. Standard epoxy primer needs 8-12 hours to recoat. A polyaspartic primer recoats in 60-90 minutes — that’s the magic that makes single-day jobs possible. Vapor barriers usually need 12-16 hours minimum.
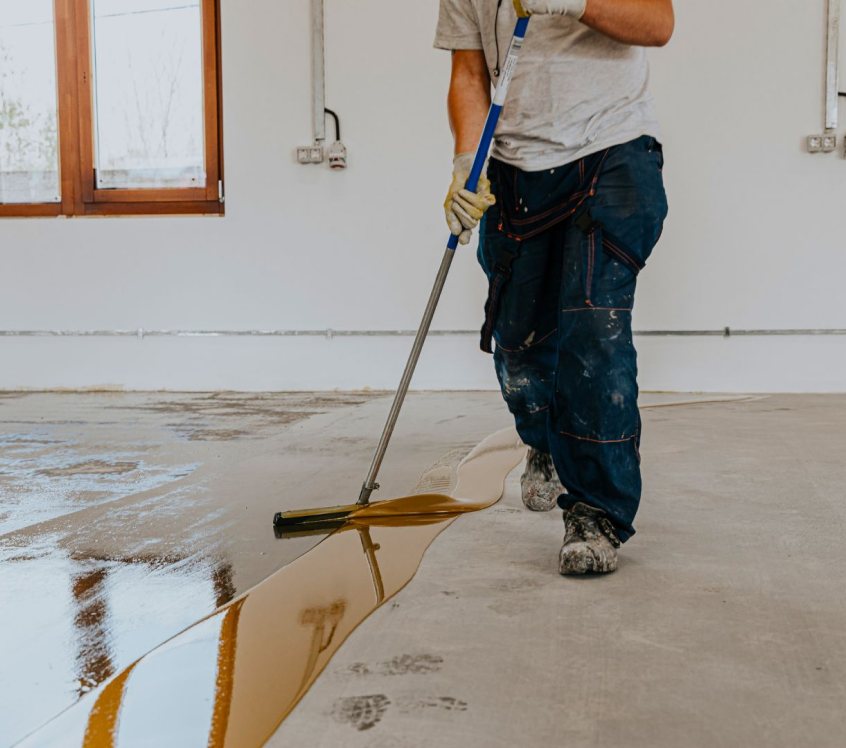
This is the day your garage starts looking like a garage floor instead of a construction site. The base coat is the structural layer — it’s what holds the color, supports the flakes, and gives the system its build thickness.
For traditional epoxy we use 100% solids in your chosen base color — Sherwin-Williams ArmorSeal 8100 or Spartan Surfaces’ SPARTACOTE Flex SB for polyaspartic. Behr Premium is fine for DIY but we don’t run big-box product professionally. Base goes down at 8-12 mils wet using a notched squeegee then back-rolled. 2-car bay: 60-90 minutes to coat.
While the base is wet, we broadcast vinyl color flakes (Torginol or Color Chips, Inc.) to refusal — throw flake until the floor is fully covered and excess bounces off. Two-person job: one rolling base, one tossing flake right behind. Timing is everything — if the base sets up before the flake hits, the flake won’t embed. 2-car bay: 20-30 minutes of frantic work, then we walk away.
The base with embedded flake needs to cure hard enough to walk on with spiked shoes before we scrape. Polyaspartic: 60-90 minutes. Epoxy: overnight. After cure, we scrape with a 5-inch razor blade on a pole — knocks off loose flake standing up like little flags, leaving a smooth profile for the topcoat.
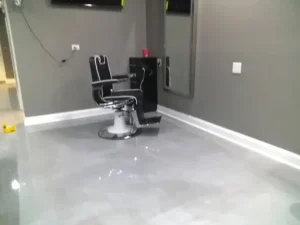
Day 3 is the shortest install day but it’s the day that decides how the floor holds up to hot tires, gasoline drips, jack stands, and the kids’ bikes. The topcoat is the sacrificial wear layer — it takes the abuse so the color coat doesn’t have to.
For premium jobs we run a 2-component polyaspartic clear like SPARTACOTE Clear PURE or Citadel Polyaspartic 85. For budget jobs it’s a 2-part epoxy clear topped with a polyurethane. The clear goes down at 4-6 mils wet using the same squeegee-and-backroll method. Coverage on a 2-car bay is 60-75 minutes including a perimeter cut-in. Pot life for polyaspartic is short — 20-30 minutes once mixed — so we mix small batches and move fast.
Here’s where homeowner expectations get fuzzy. “Done” means we’re packing tools. “Use it” depends on what you’re doing. Foot traffic in socks: 8-12 hours after the topcoat for polyaspartic, 24 hours for epoxy. Pets back in: same as foot traffic but add 4 hours so the off-gassing isn’t bothering them. Heavy objects (toolboxes, fridges): 24-48 hours. Driving a car on it: that’s the big one — see the cure-times section below.
The marketing claim is everywhere: “Get your dream garage floor in just ONE DAY!” It’s true. It’s also frequently a lie. Let me explain both.
A legitimate single-day polyaspartic install looks like this: crew of 3-4 arrives at 7 AM, grinds and preps from 7 to 11, lays primer at 11, base coat with flake broadcast at 1 PM, scrape at 3:30, clear topcoat at 4:30, packs up at 6 PM. That’s 11 hours start to finish. Walk on in socks by midnight. Drive on the next afternoon. This works because polyaspartic recoats in 60-90 minutes — the cure chemistry literally allows it.
Here’s where contractors fudge: they skip the diamond grind in favor of an acid etch (which doesn’t open a real profile), they skip the primer to save 90 minutes, they apply the flake into a half-set base so it doesn’t lock in, and they thin the topcoat to extend the pot life. The job looks great for 6 months. Then the flakes start letting loose at the garage door threshold where hot tires hit, and within 18 months you’ve got peeling at the edges and bald spots where the dog walks.
Three tells: First, ask if they’re diamond grinding or acid etching — if it’s acid etch, walk away. Second, ask what the recoat window is for the product they’re using and watch them quote you something suspiciously short. Third, look at their truck — a legitimate single-day crew has a planetary grinder, a HEPA dust extractor, and at least two 5-gallon mixing buckets. If they show up with a shop vac and a paint roller, that’s not a coating job, that’s a paint job. Apex Epoxy Flooring runs full prep on every single-day install — no shortcuts, even when the calendar is tight.
Cure isn’t a single moment. There are three distinct cure thresholds and crossing each one unlocks a different use.
This is when the topcoat is tack-free and you can step on it in soft shoes without leaving a footprint. Polyaspartic: 4-8 hours. Epoxy: 12-24 hours. Don’t drag anything across it yet — even a cardboard box can leave a scrape.
This is the threshold most homeowners care about. Polyaspartic: 24 hours minimum, 48 hours preferred. Epoxy: 72 hours, no exceptions. The reason is hot tires — when a tire that’s been driving on Jacksonville asphalt at 95°F hits a not-fully-cured coating, the plasticizers in the rubber bond to the soft coating and lift it when you back out. This is called hot tire pickup and it’s the #1 cause of fresh-coating failure. If your installer says you can drive on it in 12 hours, get that in writing.
This is when the coating is fully crosslinked and resistant to gasoline, brake fluid, transmission fluid, battery acid, and pool chemicals. Until you cross this threshold, clean spills immediately and don’t park anything that drips. After full cure, the floor is bulletproof.
Jacksonville sits at 75-85% relative humidity from May through October. Epoxy chemistry hates humidity — too much moisture in the air during cure causes amine blush (a milky, sticky film) and slows the crosslink reaction. Here’s how a good Florida crew works around it.
Our crews start at 7 AM whenever possible. Florida afternoon thunderstorms typically roll through between 2 PM and 5 PM from June through September. If we’re applying a topcoat at 4 PM with a thunderstorm 20 minutes out, we’re risking moisture infiltration through an open garage door. We schedule final topcoats for morning whenever possible, especially during the wet season.
For high-end jobs and any commercial work, we bring a portable dehumidifier (Phoenix 200 MAX or similar) into the garage during cure. Drops the RH inside the bay from 80% to 50% in about two hours. Makes a huge difference for polyaspartic, which is more humidity-sensitive than epoxy.
If we walk in at 7 AM and the dew point is above 70°F, we’ll often delay the first coat by 2-3 hours to let the slab warm above the dew point. Applying coating to a slab that’s colder than the dew point causes condensation under the coating — instant adhesion failure. Sometimes this pushes a single-day install to a day-and-a-half. We’d rather lose a half day than rip the floor up and start over.
Ideal application temps are 65-85°F surface temperature. Below 60°F (rare here but happens in January mornings), the chemistry crawls. Above 90°F, pot life shortens dangerously — a 30-minute pot life can drop to 8 minutes in a 95°F garage. We use an infrared thermometer to check the slab temp every couple of hours.
Atlantic hurricane season runs June 1 through November 30, with peak risk for Jacksonville from mid-August through late October. The best install windows are March through May (low humidity, mild temps, dry weeks, no storm risk) and November through February (cool, dry, no storms — just watch for the occasional cold snap dropping below 60°F overnight). Avoid late August through October when possible — not because the install can’t be done, but because if a named storm forms and you have to evacuate mid-cure, you’ve got a problem. Apex Epoxy Flooring tracks the National Hurricane Center 5-day cone before scheduling installs in peak season, and we’ll reschedule at no charge if a storm threatens within 72 hours of your install date.
Sometimes a 3-day quote becomes a 4-day reality. Here’s why, in order of frequency.
Moisture content changes with the seasons and after heavy rain weeks. If the slab tests high on install day, we add a moisture-mitigating primer — 12-24 hours added to the timeline. Most common with slabs poured directly on grade in low-lying neighborhoods.
Cracks you can’t see under paint or sealer show up plainly after grinding. Ten cracks adds 30 minutes; a hundred cracks adds half a day. Older slabs (1980s and earlier) in Murray Hill, Ortega, and parts of San Marco tend to have more cracks than newer construction.
Where a car has been parked for 20 years, oil soaks deep into the concrete. Grinding alone doesn’t pull it out — we either grind deeper, spot-treat with degreaser and TSP scrub (adds 2 hours), or in extreme cases use an oil-stop primer. About 1 in 5 garages needs this extra work. Damaged garage door thresholds need polymer-modified mortar repair too — 30 minutes of work plus 2-4 hours of cure before we can coat over it.
Polyurea garage floor coating offers a smart, long-term solution for homeowners looking to improve both the look and performance of their space. With its fast-curing application, it stands up to Florida’s climate and daily use without losing its appeal. For those seeking durability, safety, and a polished finish, polyurea flooring delivers both function and style that lasts.
If you’ve been getting quotes for a new garage floor in Jacksonville, you’ve probably heard
The “epoxy” rolled onto your neighbor’s garage floor on a Saturday afternoon and the “epoxy”
How Florida Humidity Affects Epoxy Floor Installation (And How Apex Gets It Right) Florida’s humidity
For just $2,700, give your 3-car garage a professional epoxy flooring finish backed by our lifetime warranty. Fill out this form below to take advantage of this limited time offer!
For just $2,300, give your 2-car garage a professional epoxy flooring finish backed by our lifetime warranty. Fill out this form below to take advantage of this limited time offer!
Ready to upgrade your garage with Apex Epoxy Flooring? Fill out the form below, and let us handle the rest. Whether it’s a 2-car or 3-car garage, we’re here to deliver top-notch service.